Showing posts with label Crafty Bastards. Show all posts

Thursday, February 04, 2010

Porch Ceiling Decor

I got inspired by seeing this done in Clyde's and at a retail store in Old Town, so I took a walk around my neighborhood and gathered all the down branches that I could find. I interlaced a criss-crossing wire (wreath or floral wire) on either side of the ceiling of my balcony, then I guided the branches above them, so that they rest on top of the wire. I then interlaced the branches with white Christmas lights. Here is the result. I am not totally done with it yet, as there are a few extra touches that I have not done yet, but here is the general idea. I think that it is gorgeous!


Thursday, October 23, 2008

Tuesday, October 21, 2008

A Haunting


My Halloween haunting of my house thus far has been heavily spider themed, and I am not quite sure why...I guess you portray in your decoration the things that scare you the most. hmmm..
Anyways, I wanted to give you all a sneak peak into my decorations SO FAR...


Here is the big Mama spider out front.


Here is Junior, who is ready to pounce on you from the bush next to the sidewalk!


Here is the hall out front...


Here is the pumpkin and candelabra out front...


And the new tee shirt that I made last night! I took a plain white tee shirt that I had, dyed it with RIT dye, then printed out this picture on Iron Transfer paper, and Voila...my own "Tarantula" tee shirt!!!
I am now officially the biggest geek of all!
ore to come...HAPPY HAUNTING!

Tuesday, June 10, 2008

Let's make an arrangement...


Just wanted to share these pictures...
I made these flower arrangements out of flowers found in my front and back yard. They are made up of Queen Anne’s lace, Yellow Primrose, Clematis, and backed by some Aucuba leaves.


These are made up of largely the same plants, Queen Anne’s lace, Yellow Primrose, Clematis,Aucuba leaves, but added is one single Hydrangea bloom.


This is an arrangement I did in a water bowl, with Peonies. I used their leaves to cover the other surfaces of the water that the blooms did not cover to give it a swampy or lily pad like look. I anchored the blooms in place by using riverbed pebbles in the bottom of the bowl.
I did these on a day when I was cleaning up the house and thought "Wouldn't it be nice to have some fresh flowers in here?"..but with prices of things what they are, did not dream of buying flowers. So I took a look around my yard and trimmed these. And the satisfaction of having done it myself made it all much better than anything that I could have bought.
:)
Oh, and PS...our computer is still being repaired, so my blogging and e-mail hours are only during my office hours at work still. *sigh*

Monday, March 31, 2008

SPEAK NOW OR MISS MARCH CANDLE MADNESS!


I have received another order for March in this late (last day of the month) game, so I say this once more - Last Chance! E-mail your order for the March Candle, Emergence, by Midnight tonight.
Buddha and I have been working hard all day trying to prepare these orders. As you can see, he is exhausted.

Here is the latest batch, ready to ship out.

Ok, because of this influx of last minute March orders, I will probably not be posting the April Candle design till tomorrow. Unless I get crazy efficient and over achieve. Which is not out of the question.
Remember to visit Candles By Stephen for pricing info, and you can e-mail orders to candlesbystephen@yahoo.com
Buddha and I will ship your orders out to you as soon as your candles are completed.

Wednesday, January 02, 2008

A NEW ENDEAVOR


After making homemade candles as Christmas gifts this past season, and after incredible feedback as to their design and scent, and due to many friends comments and advice, I am trying to start a new endeavor for myself. I am going to go ahead and sell my candles online, through this and a few other websites.
They come in many different colors and styles, can be custom made and designed to color specifics and sizes, but will always be one of a kind.
A new website devoted to this endeavor alone will be launched in the next day or two with much more information, but I wanted to go ahead and give a heads up to all of you, my faithful readers.
The featured candle style of January is pictured above and below. The design features a snowy white, pale baby blue, and deep navy to reflect the color characteristics of this Winter month. These candles are offered in votive size, medium oval size, and large star design size. Pricing is still being determined, but these will not be ridiculously priced. I want to sell these candles not only as a means to help support myself as an actor living in a very expensive city, but also because I genuinely LOVE designing and making them.
There will be a different candle theme/color scheme for each month of the year, plus other unique designs featured on the website, all available for purchase. I am also going to offer a candle of the month subscription, where the featured design of the month will be delivered to your house.
These candles make fantastic gifts (as I know from this past Christmas), and also look elegant anywhere in your house. More details will soon follow, along with the website, that will be linked on my side bar.

You can look at some photos of a selection of the candles I have made so far at CandlesByStephen's Flickr Photo page by CLICKING HERE.
Shoot me an email at candlesbystephen@yahoo.com to let me know what you think or if you are interested in pre-ordering the candle of the month!
Thanks,
Stephen Gregory Smith

Saturday, December 08, 2007

Charlie Brown Christmas


I put up the Charlie Brown Christmas display tonight. We didn't have the real tree that looked like the pitiful tree of the theme, as it had been cut down by landscapers this fall, but I improvised and made this.
What do you think?

Friday, November 09, 2007

Fall Clean Up 2007


SO, look at this mess! I had to clean up, put away, and winterize my back yard yesterday while I had the time. What a grueling and disgusting job! I usually wait until it is a little bit colder, so I can avoid a majority of the creepy crawlie critters, but my time was limited, so I did it yesterday. I had some Halloween yard stuff to put away, the tent had to come down, the fountain had to be emptied, Halloween lights had to be taken down, and plants cut back to soil level. Where should I even start?


First, all objects for disposal, or to be put away met in separate piles on the table.
I think that Drowned Pumpkin sensed his imminent fate...


I also had to take all objects screwed into the fence down, as we are getting a new fence in a week or so, and take the refrigerator in for the winter. I had to unscrew: a planter, some screws holding up lights, a framed picture, and a singing fish mounted on plastic.
You heard me.


And while I took a swipe at taking down the other Halloween beasties, I had not put them away properly, and had not even attempted to take town Ms. 1930.
Remember Ms. 1930?


Here she is after being stripped nekkid and snatched bald headed...


But what's that I spy on her nekkid shoulder?
UGH! A SPIDER!


No, I didn't kill it, I simply plucked it off and hoped for the best for it. Next up? The tent. Ugh, more spiders, as they tend to nest in it. I took off the fabric part, shook it out (ugh-they flew everywhere!) and folded down the tent's frame...
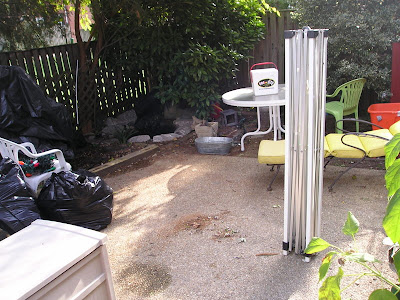


Now to get the frame into it's protective bag for the winter...wait, what is that yellow speck on the cover, is that? It's MOVING! A Yellow SPIDER!!!


Disgusted by his personage, but inspired by his hue, I painted two outdoor boxes yellow to match his gorgeous color.


I went through all my yard supplies, old pots, Halloween stuff, and decided that I had WAY too much. I went through everything, deciding that things that I did not use this past year, I would not miss by next year. Look at all of the trash!


After all the blood, sweat, and spiders, I am pleased that the yard now looks more open and clear for the cold and (hopefully) snowy months to come. I always like the look of the yard stripped to its bareness this time of year. When Spring and summer roll around, and it is burgeoning with bounty, it almost seems impossible that it sprang forth from this. A wiped clean slate is good to have sometimes. It allows other possibilities to present themselves later.
Hopefully those possibilities will arise without spiders.
;)
luv,
SGS

The finished product:

Sunday, July 08, 2007

Birthday Week Crafts...


In preparation for my birthday party, which was a week ago, I of course wanted to make the house look extra festive. While walking a dog in Arlington about 2 weeks ago, I spotted a large discarded painting on the curb. Looking at it, it was no wonder why it was discarded. It was a farm scene in the fall, cheekily painted.

I picked it up and put it in my car, having something in mind for this gigantic frame. I stopped by Target and bought a long and thin poster of James Dean, then went home to prep the frame. I taped off the appropriate ares and painted the frame green apple, then the matte a baby blue. I mounted the poster and sealed it.


I then moved it to my entertainment center, and put four votive holders under each picture. Matty and I can never find anything large enough to dwell on top of the entertainment center and be a sort of focal point, and I think I have succeeded with this curb transformation.


Also, knowing that I did not have enough room in the fridge for food and beer, etc, I dusted off my old college refrigerator from the storage closet and found a way to make it look a little more festive. I wallpapered it with my old Garbage Pail Kids cards. It took on a fun, if not gaudy retro 80's look that I find fun. I moved it outside for the festivities.


I then turned my eye to my bathroom and wanted to tart it up a bit. Taking a point of view of the painting that rest on the back of the toilet, which is of a playing card Joker, I took a deck of cards and pulled the appropriate ones and attached them to the tiles with putty. Sean came up from the bathroom later that evening laughing, saying that I was brilliant. (He got the joke; the cards on the tiles worked out to a royal flush.)


I added a few other subtle touches....a nice down spot on the Marilyn Monroe picture in the living room that kind of makes it look like she is stepping into the light of a street lamp...


I added all red lights to the hanging paper lanterns in the living room...


Also, Matty got me a lovely bunch of flowers for the dining room table...


I also picked and arranged these myself...


Now that I had tarted my house up sufficiently, the party was ready to begin...

Monday, May 28, 2007

Happy Memorial Day!


I did this 2 days ago. Add a cheap bunting to a white flower planting and a blue planter and you have instant beauty.

Crafty Bastards...50's decor


So, how do you take an ordinary table and make it fabulous?
Well, the 50's are back this summer, and the 50's pastels are in for sure.


So here is the plan...get some black and white contact paper from the drug store.


I painted the whole thing this 50's teal.


I applied the contact paper to the top of the desk, cutting off the excess with my razor.


The devil is in the details...I painted the handles a darker hunter green, and put the same black and white contact paper in the drawers.


I added highlights to the front face of the desk by cutting spaced to fit addendum panels...


I also spray painted the runner boards of the desk the same Hunter Green that I painted the handles of the desk.


Here is the finished 50's desk. I am glad to have shared the process.